Advantage of seven segment display-
- It uses low power for its operation less than 2.5V.
- Comes in industry standard size.
3.Comes with a industry standard pin out which can be directly referred from datasheet.
- Seven segment displays comes in different size, so user can use according to their requirement like 7.6mm, 10mm, 14.2mm etc.
5.You can also choose colour of your display. Commonly used- Red, Yellow, and Green.
Two types of 7 segment display are available in market. And they can be used according to the type of application they are as follows-
- Common Cathode display– In this type of display, cathode terminal of all LED’s are connect together. If you want to illuminate a segment of common cathode display then provide power supply to that section and ground the common pin (DP). Following figure shows the internal connection of 7 segment common cathode display.
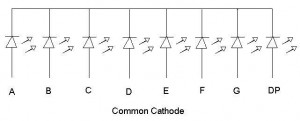
- 2. Common Anode Display– In this type of display, anode terminal of all LED’s are connect together. If you want to illuminate a segment of common anode display then connect that section to ground and provide power supply to common pin (3 and 8 or DP). Following figure shows the internal connection of 7 segment common cathode display.
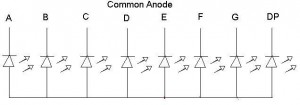
Always use a resistor while using 7 segment display to illuminate the specify segments, in both 7 segment, common cathode and anode. Because maximum voltage which it can resist is 2.5V therefore excess voltage may harm the individual segment of display. You can use resistor value of 220 ohm or 330 ohm.
How to identify and check the seven segment display-
You have purchase a display from market and you want to confirm whether you have purchase the correct display or your display is working properly or not then you can use the procedure describe below. Suppose you have completely assembled your circuit and through troubleshooting you came to know you have used a incorrect (used common cathode in place of common anode) or faulty display then your time and hard work both will be wasted. So check before you use.
For checking the display you require a simple tool that is your multi-meter. Steps follow while testing seven segment displays–
- Hold the display in your hand and identify the pin 1.This can be done as shown in figure below. Advantage of seven segment display-
- It uses low power for its operation less than 2.5V.
- Comes in industry standard size.
3.Comes with a industry standard pin out which can be directly referred from datasheet.
- Seven segment displays comes in different size, so user can use according to their requirement like 7.6mm, 10mm, 14.2mm etc.
5.You can also choose colour of your display. Commonly used- Red, Yellow, and Green.
Two types of 7 segment display are available in market. And they can be used according to the type of application they are as follows-
- Common Cathode display– In this type of display, cathode terminal of all LED’s are connect together. If you want to illuminate a segment of common cathode display then provide power supply to that section and ground the common pin (DP). Following figure shows the internal connection of 7 segment common cathode display.
- 2. Common Anode Display– In this type of display, anode terminal of all LED’s are connect together. If you want to illuminate a segment of common anode display then connect that section to ground and provide power supply to common pin (3 and 8 or DP). Following figure shows the internal connection of 7 segment common cathode display.
Always use a resistor while using 7 segment display to illuminate the specify segments, in both 7 segment, common cathode and anode. Because maximum voltage which it can resist is 2.5V therefore excess voltage may harm the individual segment of display. You can use resistor value of 220 ohm or 330 ohm.
How to identify and check the seven segment display-
You have purchase a display from market and you want to confirm whether you have purchase the correct display or your display is working properly or not then you can use the procedure describe below. Suppose you have completely assembled your circuit and through troubleshooting you came to know you have used a incorrect (used common cathode in place of common anode) or faulty display then your time and hard work both will be wasted. So check before you use.
For checking the display you require a simple tool that is your multi-meter. Steps follow while testing seven segment displays–
- Hold the display in your hand and identify the pin 1.This can be done as shown in figure below.
- Now take multi-meter (Assumption followed red lead for positive and black lead for negative). Set the multi-meter in continuity range.
- Check for sound test (touch both the leads together sound will produce). Sometimes it may possible, battery of your multi-meter become weak and we will be not being able to get the display.
- Put the Black lead of multi-meter on pin 3 or 8 both are common pin as they are internally connected.
- Now put Red lead of multi-meter on any other pin may be 1, 5.
- If any of the segment glows then your display is common cathode.
- If none of the segment glows than interchange the leads of multi-meter.
- Connect the Red lead of multi-meter on pin 3 or pin 8 as both are common pin and internally connected to each other.
- Now put the black lead of the multi-meter on other remaining pin. If any of the segment glow than your display is common anode, as in common anode positive pin is common and rest are supplied with negative supply.
- Check all segments of both common cathode and anode to ensure your display is working properly.
- If none of the segment glows means your 7 segment is faulty.
I hope this will save your time and energy for identification and let you know how to test seven segment display.



Post Comment
You must be logged in to post a comment.