Lm35 with Arduino
LM35 is the best temperature sensor you can use it with ARDUINO, because it is easy to wire and program it does not need interfacing circuit, you can connect LM35 direct to ARDUINO.
Why LM35?
- You can measure temperature more accurately than a using a thermistor.
- The sensor circuitry is sealed and not subject to oxidation, etc.
- The LM35 generates a higher output voltage than thermocouples and may not require that the output voltage be amplified.
What Does an LM35 Do? How does it work?
- It has an output voltage that is proportional to the Celsius temperature.
- The scale factor is .01V/oC
- The LM35 does not require any external calibration or trimming and maintains an accuracy of +/-0.4 oC at room temperature and +/- 0.8 oC over a range of 0 oC to +100oC.
What you need?
1)Any ARDUINO board.
2)LM35 sensor.
3)Breadboard.
4)Wires (MALE-MALE).
How LM35 looks:

Here is the data sheet for LM35:
http://www.ti.com/lit/ds/symlink/lm35.pdf
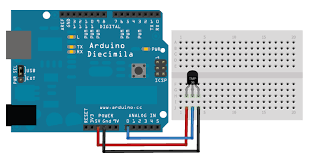
In this picture you can see how we can wire LM35:
[message_box title=”MESSAGE TITLE” color=”yellow”]
The code:
/*
Programmer: Emad Alomari
https://www.engineersgallery.com
*/
void setup()
{
Serial.begin(9600); //open serial port on 9600 bits/sec
}
void loop()
{
int value = analogRead(A0); // convert the readings to millivolts
float millivolts = (value / 1024.0) * 5000;
float celsius = millivolts / 10; // LM35 sensor output is 10mV per degree Celsius
float fahrenheit = (celsius * 9)/ 5 + 32; // convert to fahrenheit
//display temperature in celsius and fahrenheit
Serial.print(celsius);
Serial.print(” C”);
Serial.print(” “);
Serial.print(fahrenheit);
Serial.print(“F”);
Serial.println();
delay(1000); // wait one second
}
[/message_box]





Post Comment
You must be logged in to post a comment.