READING ON MICRO METER
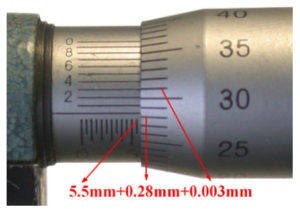
It works on the fine assembly of nut and bolt principle where pitch of both nut and bolt plays a big role. The graduation on the barrel of micrometer is in two parts, namely one above the reference line and the other below. The higher line graduation above the reference line is graduated in 1 mm intervals. The first and every fifth are long and numbered 0, 5, 10, 15, 20 and 25. The lower or small graduations are graduated in mm intervals but each graduation shall be placed at the middle of the two successive upper graduations to be read 0.5 mm. The micrometer screw has a pitch of 0.5 mm, while the thimble has a scale of 50 divisions round its circumference. Thus, on making or rotating through one complete turn, the thimble moves forward or backward by one thread pitch of 0.5 mm, and one division of its scale is, therefore, equivalent to a longitudinal movement of 0.5 × 1/50 mm = 0.01 mm. It is the value of one division on the thimble, which is the least that can be correctly read with the help of a micrometer and is known as the least count. For measurement, the job is kept between the end of the spindle and the fixed anvil, which is fitted to the frame. When the micrometer is closed, the line marked 0 (zero) on the thimble coincides with the line marked 0 (zero) on the graduated sleeve. In metric outside micrometer, the pitch of the spindle screw is 0.5 mm and the graduations provided on the spindle of the micrometer are in millimeters and subdivided into 0.5 mm. Now in one turn of the thimble of the micrometer, owing to the 0.5 mm. pitch of the spindle screw, the spindle will move through 0.5 mm and therefore, the corresponding opening between the faces of the fixed anvil and the spindle
will be 0.5 mm. This opening will go on increasing by the same distance 0.5 mm for each further rotation of the thimble. The beveled edge of the thimble carries 50 equal divisions on its periphery in which every 5th division is marked. It is seen above that for one complete turn of the thimble the spindle moves through 0.5 mm. Now let the thimble is rotated one small division on its beveled edge i.e. 1/50 of the turn. The corresponding displacement of the spindle will then be 0.5 × 1 /50 = 0.01mm.
Depth micrometer is used for measuring depth of holes and is shown in Fig. 19.13. Screw thread micrometer (Fig. 19.14) is used to measure the pitch diameter of the thread to an accuracy of 0.01mm and 0.001 inches. It comprises of similar parts as that of outside micrometer accept the shapes of fixed and moveable anvils. The fixed and moveable anvils possess the thread profiles for thread adjustment for measurement of the pitch diameter. Source A Textbook of Basic Manufacturing Processes and Workshop Technology by Rajender Singh.



Post Comment
You must be logged in to post a comment.