[nextpage title=”Introduction” ]
Robot Guitar – bringing unseen data sources into the real world
In one of those moments when something, some image or concept can completely capture one’s imagination, as I idly wandered through the Japanese pavilion at World Expo 1988 in my hometown of Brisbane Australia, I saw a robot playing a classical guitar. And I was awestruck. In fact I still am. I mean, how clever are humans to create a system that plays with such high fidelity, and be perfect in doing so every single time? How?
That robot was really really cool. Even if it is true that a human creator put together the hardware and software in the right order to make it work. But it got me thinking. Was the robot just a tool, I wondered, like a simple guitar plectrum that a human has created and simply told what to do? Was it more than this, was it less than this? I was a teenager in 1988 and with the certainty of a teenager, I resolved then and there that both human AND robot guitar players were cool in subtle and perhaps not-so-subtle ways and yes, I promised myself that I’d have a go at building something like this one day.
As I learnt the guitar slowly over the years I often thought of this robot and wondered how it must compare to the infinitesimally more complex and unknown nuances that humans possess & invest into making music. Surely it would never come close to playing music with the unconscious & sometimes random, very human ‘things’ that we do. Spontaneous things, actions such as muting certain strings a tiny bit, or bending strings ever so slightly, or selectively just going full whack at it like my guitar hero Billy Bragg does. Maybe it’s all those little imperfections, the finger squeaks and educated mistakes that make an interesting piece of music – the mistakes that only a human can make properly.
Many years and much existential ponderings passed in this way, at the same time systems such as the Arduino and Raspberry Pi became prevalent, and electronics became more accessible than ever before. As a hobby, I began rediscovering my basic electronics knowledge, and as my confidence grew I realised that all this stuff was exactly what I needed to build that robot guitar I’d promised myself at Expo88. The elements were now coming together, as I’d always been more than a little hooked on the notion of bringing previously unseen and esoteric data sources into the real world in new and interesting ways. Then in 2014 I went to my first SIGGRAPH conference in Vancouver and was subsequently blown away by the creativity I found, I saw there that people were doing some very cool things and just…putting themselves out there. Just like that! I wish I’d found that conference years earlier.
Now, 27 years on from Expo88, all the ingredients are in place for the world’s first “Network Time Protocol accurate, Internet of Things connected, Big Ben chiming grandfather clock, firewall log playing, door chiming, guitar playing robot” thingy, all built by me!. Many were the busy nights and more than a few weekends spent working on this on-again off-again project, hacking together elements of music, computing, engineering, hardware, circuitry, art, lighting, cyber security, time, and working with all sorts of materials. I had to bring it all together.
For those who find all this as interesting as I do, I’ll briefly describe the journey, from an account of early prototypes such as the Firewall Tambourine – which was a pivotal stage towards bridging that gap between realtime data and realworld.


[vimeo height=”HEIGHT” width=”WIDTH”]https://vimeo.com/124131746[/vimeo]
[vimeo height=”HEIGHT” width=”WIDTH”]https://vimeo.com/124129251[/vimeo]
[vimeo height=”HEIGHT” width=”WIDTH”]https://vimeo.com/124129125[/vimeo]
[vimeo height=”HEIGHT” width=”WIDTH”] https://vimeo.com/124129746[/vimeo]
Design notes, final version
As it happens, it’s the final stage of the project where the two most important parts of the whole finally come together, these being the servo rig and the coding.
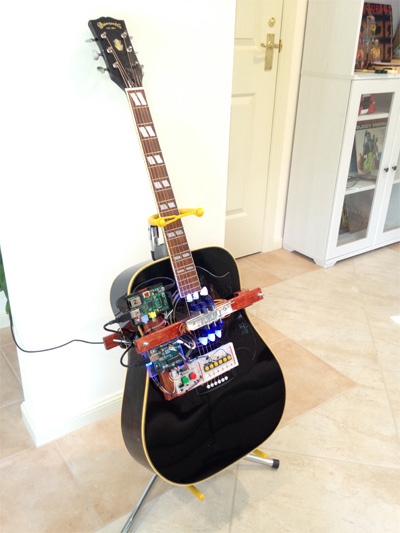
To begin, the servo rig needs to be just right. It has to be stiff enough so as not to move, whilst still allowing the pick to be adjusted up, down and sideways so as to position the tip of the pick just so; critically plucking just enough string whilst remaining at the right angle & depth so as to stay clear & not get stuck – or it would never pluck the string at all.
The picks themselves are real guitar picks which are bent so the pick point is parallel to the strings, with the relatively soft, rather than the harder picks being better for plucking the strings. The picks are affixed to the servo horns by a screw at the pivot and a small pin made from a piece of copper (from a cat6 data cable), which when inserted through the end of the horn and the pick, acts like a staple, thus making the servo and the pick one element. The servos are siliconed to small aluminium angles with slotted holes filed in the top to allow adjustment.
Another important part is the control architecture and getting the Pi and Arduino co-ordinating as intended, with each of these devices being better suited for certain tasks. For example, the Arduino is better at doing proper PWM (Pulse Width Modulation) which is required to control the position of servos, whilst the Pi offered a familiar Ubuntu/Python programming environment, wireless access for NTP and ssh, additional GPIOs and the flexibility to develop the code. The Pi is also used as a platform to write the Processing sketch which is then uploaded to the Arduino itself via the command line Arduino IDE ‘ino’. Communication between the Pi and the Arduino is done via a serial connection.
[sam id=”4″ codes=”true”]
One of the interesting tasks in the coding was that the system needs to keep track of the state of each pick (i.e. its location, is it to the left or right of the string) so it knows in which direction to move the servo. This element is programmed on the Arduino, which sets up all the picks at the initial state when the system initially boots, and then operates whichever servo the Pi asks it to via the serial connection, whilst (importantly) also updating a “pick state” array, storing the current position of each of the six servos, thus keeping state. This part took some coding and testing, but once done it was set and forget.
Other design aspects include LED lighting to illuminate the white picks with blue light. I used the waterclear type LED’s instead of the diffused type because I wanted beams of light to really illuminate the picks. I glued the LEDs under the breadboard and also underneath the Pi to give a nice glowing effect with no direct light source visible. At the last minute I also drilled a small hole in the Perspex slab the Arduino sits on and inserted an LED to see what it would look like, and I think it looks real nice!
Altogether there are six yellow manual buttons to operate and tune each pick up and down individually, and two more buttons to run pre-programmed routines. The six tuning buttons are monitored by the Arduino and the other two pre-programmed buttons are monitored by the Pi.
The main frame is made from stained pine, clamped together around the body of the guitar by means of threaded rods, while the foam padding serves to further protect the guitar. Furthermore, in terms of visual appeal I wanted the wiring, circuitry and mechanics to be raw, fairly tidy but definitely not hidden, so the viewer appreciates what goes on behind the scenes.
Finally, as my nephew rightly points out, the frets are in the substantial need of some robotic attention. I agree, however this is enough for now and yes, another maker project is added to the list…
[/nextpage]
[nextpage title=”Coding” ]
Coding
All together there are over 460 lines of code: Python and a small amount of bash for the Raspberry Pi, and Processing sketches for the Arduino. There are all sorts of interesting edge cases and logic that are coded up e.g. did you really want this thing to chime in the middle of the night, what about on weekend mornings, hmmmm??
As I coded, I was constantly reminded how challenging it is to build a machine to do this most trivial task, the act of strumming a guitar. In fact in reading the backstory, I’m struck that this is actually the very concept I wanted to explore in the first place.
[sam id=”4″ codes=”true”]
[message_box title=”Arduino Code” color=”red”]
#include <Servo.h>

Servo string;        // create servo object to control the six servos

int pos_0 = 0 ;      // variable stores the left-most position the servo will send the pick
int pos_1 = 20 ;     // variable stores the righ- most position the servo will send the pick
int string_number;   // variable to identify each string/servo
int string_state[] = {0, 0, 0, 0, 0, 0};  // to keep track of the picks position , ie: is it currently sitting to the left or right of the string?
int manual_button;   // To identify each of the 6 manual button on the breadboard above each string
int manual_button_state = 0;   // To track state of the button (pressed or NOT pressed)

void setup()  //Setup only gets run once when the Arduino is powered on
{
    pinMode(8, INPUT_PULLUP);  // Set the 6 manual buttons to be inputs
    pinMode(9, INPUT_PULLUP);
    pinMode(10, INPUT_PULLUP);
    pinMode(11, INPUT_PULLUP);
    pinMode(12, INPUT_PULLUP);
    pinMode(13, INPUT_PULLUP);

    Serial.begin(9600);  //Start the Serial interface, the interface to the Raspberry Pi
    for (string_number = 0; string_number < 6 ; string_number++)  {   // At boot time, initialize each servo to a starting pick position
      string.attach(string_number+2);  // Attach to the servo pin corresponding to the correct string number
      string.write(pos_0);   // Tell the servo to go to pos_0, get ready to rock.
      delay(100);  // Give plenty of time for each pick to get into starting position
    }
}

//////// As its name suggests, the ardunio "loops" through this function continually, as fast as it can
void loop()
{
////// MANUAL BUTTON CONTROL
    for (int manual_button = 0; manual_button < 6; manual_button++)  {
      manual_button_state = digitalRead(manual_button + 8);  // Read the status of the pin attached to the button
      string_number = manual_button;
      if (manual_button_state  == 0) {  // If the pin is set to INPUT_PULLUP, a state of zero means the button is pressed.
        pluck(string_number,string_state[string_number]);  // call pluck function, also pass the state of the string so we'll know which way to pluck it
        if ( string_state[string_number] == 0) {
          string_state[string_number] = 1;  //toggle the state of the servo to keep track of where the pick is for next time we want to pluck it
         }
        else  {
          string_state[string_number] = 0;  //toggle the state of the servo to keep track of where the pick is for next time we want to pluck it
        }

	while(manual_button_state == 0) {
	manual_button_state = digitalRead(manual_button + 8);
	}
	}
      }

////// SERIAL COMMUNICATIONS CONTROL (from the Pi)
   if (Serial.available())  {
     string_number = Serial.read() - '0';  //Read what value is being sent over Serial from the Pi
     Serial.println(string_number);
     pluck(string_number,string_state[string_number]);   // call pluck function, also pass the state of the string so we'll know which way to pluck it
     if ( string_state[string_number] == 0) {
        string_state[string_number] = 1; //toggle the state of the servo to keep track of where the pick is for next time we want to pluck it
      }
     else
     {
        string_state[string_number] = 0; //toggle the state of the servo to keep track of where the pick is for next time we want to pluck it
     }
   }
   delay(100);
}
//////// END OF MAIN LOOP

//////// Pluck function makes the servo move
void pluck(int string_number , int state){
    string.attach(string_number + 2);   //Attach to the servo sitting above string_number
    if (state == 0)                     //move the servo from left to right
    {
      string.write(pos_1);              //Tell servo to go to position in variable 'pos_1'
     }
    if (state == 1)                     //move the servo from right to left
    {
      string.write(pos_0);              //Tell servo to go to position in variable 'pos_2'
    }
}
[/message_box]
[message_box title=” Grandfather clock / Big Ben hourly chiming ” color=”red”]
#!/usr/bin/python
# This script is run as a cronjob, at every 59 minutes past the hour.
# 59 * * * * python /home/pi/ardunio/bigben/go_bigben_gong.py >/dev/null 2>&1
# Also make sure to update NTP, no one likes an innacurate robot guitar
# 50 * * * * /usr/sbin/ntpdate -dv pool.ntp.org

import glob
import serial
import time
import RPi.GPIO as GPIO
from time import sleep , strftime

arduino_serial_id = glob.glob("/dev/ttyACM*")[0]
ser = serial.Serial(arduino_serial_id , 9600)
GPIO.setmode(GPIO.BCM)
GPIO.setup(22, GPIO.OUT)
GPIO.setup(27, GPIO.OUT)
GPIO.output(22,True)
GPIO.output(27,True)
wait = .75          # time between pre-chimes
wait_longer = 1.0   # Can play with this value so to give a more random timing effect
wait_gong = 2.0     # Wait this long between the pre-chimes and the hour gongs

# Quoting from http://en.wikipedia.org/wiki/Big_Ben
# One of the requirements for the clock was that the first stroke of the hour bell should register the time
# correct to within one second per day. So, at twelve o'clock, for example, it is the first of the twelve
# hour-bell strikes that signifies the hour.
# If this script is run by cronjob at the 59th minute of every hour, calculate how long to wait before
# beginning the chime sequence (ie for the next hour to turn)

must_sleep_for = (60 - (7 * wait) - (2 * wait_longer) - (1 * wait_gong) - 2)
# Strobing of the 2 blue LED's gives a visual warning the guitar is about to rock.
must_strobe_for = 10

# This is the number of the _next_ hour, to be used later on  hour gongs.
gongs = int(strftime("%I").lstrip("0")) + 1

# special case where the current hour is 12, need to make a acorrection for 1pm
if gongs == 13:
    gongs = 1

# need this later when working oout when _not_ to chime whilst one sleeps
gongs_24h = int(strftime("%H").lstrip("0")) + 1
day_of_week = int(strftime("%w"))

def strobe_blue_lights(must_strobe_for):
    blink_for = 0.05
    start = time.time()
    abort_after = must_strobe_for - 5
    while True:
        delta = time.time() - start
        print delta
        if delta >= abort_after:
            GPIO.output(22,True)
            GPIO.output(27,True)
            break
        GPIO.output(22,True)
        GPIO.output(27,False)
        sleep(blink_for)
        GPIO.output(22,False)
        GPIO.output(27,True)
        sleep(blink_for)

def chime():
    ser.write('4')
    sleep(wait)
    ser.write('3')
    sleep(wait_longer)
    ser.write('1')
    sleep(wait)
    ser.write('2')
    sleep(wait)
    sleep(wait)

    ser.write('2')
    sleep(wait)
    ser.write('3')
    sleep(wait_longer)
    ser.write('4')
    sleep(wait)
    ser.write('3')

    sleep(wait_gong)
    for i in range(0,gongs):        # Run loop 'gong' times
        ser.write('0')          # The FIRST of these gongs signifies the exact change of hour
        sleep(wait_gong)

sleep(must_sleep_for - must_strobe_for)
sleep(5)

if day_of_week > 0 and day_of_week < 6 and gongs_24h > 5 and gongs_24h < 21: # don't chime till 6am on weekdays
    strobe_blue_lights(must_strobe_for)
    chime()
elif (day_of_week == 0 or day_of_week == 6) and gongs_24h > 9 and gongs_24h < 21: # don't chime till 10am on weekends
    strobe_blue_lights(must_strobe_for)
    chime()
[/message_box]
[message_box title=” Firewall logging” color=”red”]
#!/usr/bin/python
from time import sleep

def follow(thefile):
    thefile.seek(0,2)      # Go to the end of the file
    s = 0.2
    while True:
        line = thefile.readline()
        if not line:
            sleep(s)    # Sleep briefly
            if s < 1.0:
                s += 0.00001
            continue
        yield line

logfile = open("/var/log/ufw.log")
loglines = follow(logfile)

for line in loglines:
    if "DPT=" in line:
        DPT = int(line.split("DPT=")[1].split(" ")[0])
        if DPT <= 1024:
            execfile("/home/pi/ardunio/bigben/go_strum_E.py")
            print "###### LOW PORT < 1024"
	    print DPT
        else:
            execfile("/home/pi/ardunio/bigben/go_strum_e.py")
            print "###### HIGH PORT > 1024"
	    print DPT
    print line,
[/message_box]
[message_box title=” Preprogrammed button monitoring (green button)” color=”red”]
#!/usr/bin/env python
# Script monitors the green pregrogrammed button, when pressed it calls 2 other scripts which strum the guitar fom top to bottom, then bottom to top
# Script runs on pi boot via /etc/init.d/

from time import sleep
import RPi.GPIO as GPIO
sleep(30) # including a sleep time seemed to fix some power demand issues on boot time.

GPIO.setmode(GPIO.BCM)
GPIO.setup(25, GPIO.OUT)
GPIO.output(25,False)

GPIO.setup(25, GPIO.IN, pull_up_down = GPIO.PUD_UP)

first_time = 1 # On boot, the pi seemed to send a current to the pins by itself as part of a startup sequence, so this was an attempt to stop the strumming whenever the pi rebooted. Mileage may vary on this.. It works for me...

while True:
    sleep (.01)
    if ( GPIO.input(25) == 1 and first_time ==0):
        execfile("/home/pi/ardunio/bigben/go_strum_Eadgbe.py")
        execfile("/home/pi/ardunio/bigben/go_strum_ebgdaE.py")
        #print "pressed"
        while True:
            if  GPIO.input(25) == 0 :
                break
        first_time = 0
[/message_box]
[message_box title=” Strum down” color=”red”]
#!/usr/bin/python
import glob
import serial
from time import sleep

arduino_serial_id = glob.glob("/dev/ttyACM*")[0]
ser = serial.Serial(arduino_serial_id , 9600)
# The Ardunio wants to reboot whever it gets a serial connnect, this is a well known issue.
# There are a few solutions, one involves using a capacitor to the RST pin as shown on the breadboard layout.
# The following code would be required otherwise, but it would be unworkable due to excessive sleep periods.
#sleep(1)
#ser.setDTR(level=0)
#ser.dsrdtr=False
#ser.setDTR(level=False)

ser.write('0')
#sleep(.1)  # Play with these sleep values
ser.write('1')
#sleep(.1)
ser.write('2')
#sleep(.1)
ser.write('3')
#sleep(.1)
ser.write('4')
#sleep(.1)
ser.write('5')
[/message_box]
[message_box title=” Strum up” color=”red”]
#!/usr/bin/python
import glob
import serial
from time import sleep

arduino_serial_id = glob.glob("/dev/ttyACM*")[0]
ser = serial.Serial(arduino_serial_id, 9600)
# The Ardunio wants to reboot whever it gets a serial connnect, this is a well known issue.
# There are a few solutions, one involves using a capacitor to the RST pin as shown on the breadboard layout.
# The following code would be required otherwise, but it would be unworkable due to excessive sleep periods.
#sleep(1)
#ser.setDTR(level=0)
#ser.dsrdtr=False
#ser.setDTR(level=False)
#sleep(1)
ser.write('5')# The Ardunio wants to reboot whever it gets a serial connnect, this is a well known issue.
# There are a few solutions, one involves using a capacitor to the RST pin as shown on the breadboard layout.
# The following code would be required otherwise, but it would be unworkable due to excessive sleep periods.
sleep(.1)
ser.write('4')
sleep(.1)
ser.write('3')
sleep(.1)
ser.write('2')
sleep(.1)
ser.write('1')
sleep(.1)
ser.write('0')
sleep(.1)
[/message_box]
[message_box title=” Count in, and play a nice tune” color=”red”]
#!/usr/bin/python
import glob
import serial
from time import sleep

arduino_serial_id = glob.glob("/dev/ttyACM*")[0]
ser = serial.Serial(arduino_serial_id, 9600)
sleep(.1)

ser.write('0')
sleep(1)
ser.write('0')
sleep(1)
ser.write('4')
sleep(.5)
ser.write('4')
sleep(.5)
ser.write('4')
sleep(.5)
ser.write('4')
sleep(.5)


while True:
	ser.write('15')
        sleep(1)
        ser.write('420')
        sleep(1)
        ser.write('15')
        sleep(1)
        ser.write('0')
        sleep(1)

	ser.write('15')
	sleep(1)
	ser.write('420')
	sleep(1)
	ser.write('15')
	sleep(1)
	ser.write('0')
	sleep(.2)
	ser.write('0')
	sleep(.8)
[/message_box]
[message_box title=” Turn LED’s on” color=”red”]
#!/usr/bin/env python
# This script is used in /etc/init.d to turn the blue LED lights on when the pi boots up.
from time import sleep
import RPi.GPIO as GPIO

GPIO.setmode(GPIO.BCM)

GPIO.setup(22, GPIO.OUT)
GPIO.setup(27, GPIO.OUT)

GPIO.output(22,True)
GPIO.output(27,True)
[/message_box]
[/nextpage]
[nextpage title=”The main Rig” ]
The main rig


[sam id=”4″ codes=”true”]


[/nextpage]
[nextpage title=” Prototype 2 – Enter the servo” ]
Prototype 2 – Enter the servo
It was clear I needed to move on from the vibrating disks to get some more power to pluck the strings with volume. I bought some micro servos and learned how to control them with Pulse Width Modulation, which was easier than I imagined. Servo control is a task well suited to the Arduino, as it can control them more accurately than the Pi.
The next challenge was fitting the servos in a rig, and building a frame for the rig, Arduino, Pi and breadboard to sit on, all without damaging the guitar. This stage was a big hurdle and the one I spent most time on as I struggled with a myriad of ways to affix all the components. For example at one point I carved the servo rig from a piece of pine, however it was difficult to screw the tiny servo mounting screws into place and allowed for no adjustment. I later discovered aluminium was the perfect material for the servo rig. Pictured is one version of the frame which attached near the base of the guitar. It looked a little like the tailpiece of an old style guitar which I really liked, but it wouldn’t fit everything and wasn’t adjustable enough.
I also cut picks from all sorts of materials including from the lids of takeaway containers, which were about the right stiffness but they lacked consistency and the plastic was brittle if not cut perfectly.


[/nextpage]
[nextpage title=”Prototype 1 : Vibrating disks on guitar strings” ]
Prototype 1 : Vibrating disks on guitar strings


 This prototype extends the proof of concept by adding a guitar and more vibrating disks. The disk’s wires were soldered to the pairs of cat6 data cables, which then went back to the Pi’s GPIO’s via the breadboard. This is shown partially completed in the photos above.
Once again the length of the wires was an important factor in maximizing the movement of the disks. I also made some bridges out of Perspex to hold the strings at the resonant lengths at fret 5 and 12, which created a nice harmonic ringing sound, similar to a bell.
The problem with this prototype was volume, it sounded nice but it wasn’t very loud because the disks didn’t pluck the strings so much as vibrate on top of them; there just wasn’t a big enough sound. Also, the effect of the bridges – while very cool and bell-like – lessened the volume significantly.
[/nextpage]
[nextpage title=”Prototype 0 – The PoC firewall tambourine” ]
Prototype 0 – The PoC firewall tambourine


[sam id=”4″ codes=”true”]
The key in getting the disks to work to maximum effect was in adjusting the bend and stiffness of the connecting wires just so, putting the vibrating disks into resonance and thereby get that thumping on the tambourine. I tested this prototype by scanning it with nmap. In all my career in cyber security I hadn’t ever run an nmap against a tambourine before this point, much less did I think I’d later nmap a guitar as well!
As novel as it was to hear the Internet play a tambourine, after a short while I needed to install a small switch on the breadboard to turn the vibrating disk circuit on and off…
Whilst this prototype was only simple, it was a significant ‘hello world’ moment, as the gap had been bridged between an esoteric realtime data source and making this really, actually, do something interesting in the real world.


Post Comment
You must be logged in to post a comment.